Tor Only Firewall on Linux
The official Tor Browser has come a long way in recent years and makes it very difficult for even the most technologically inept to shoot themselves in the foot. Even so, as a solution it does not cover all possible use cases and it is still very useful to know how as an individual one can protect oneself from mistakes which can result in leaking personally identifying information.
Such a mistake can be as trivial as typing
wget http://blah.comInstead of
torify wget http://blah.comOr maybe you need to use a web browser plugin such as Java or Flash which the Tor Browser explicitly disables or even torify some other application entirely.
#Test Case
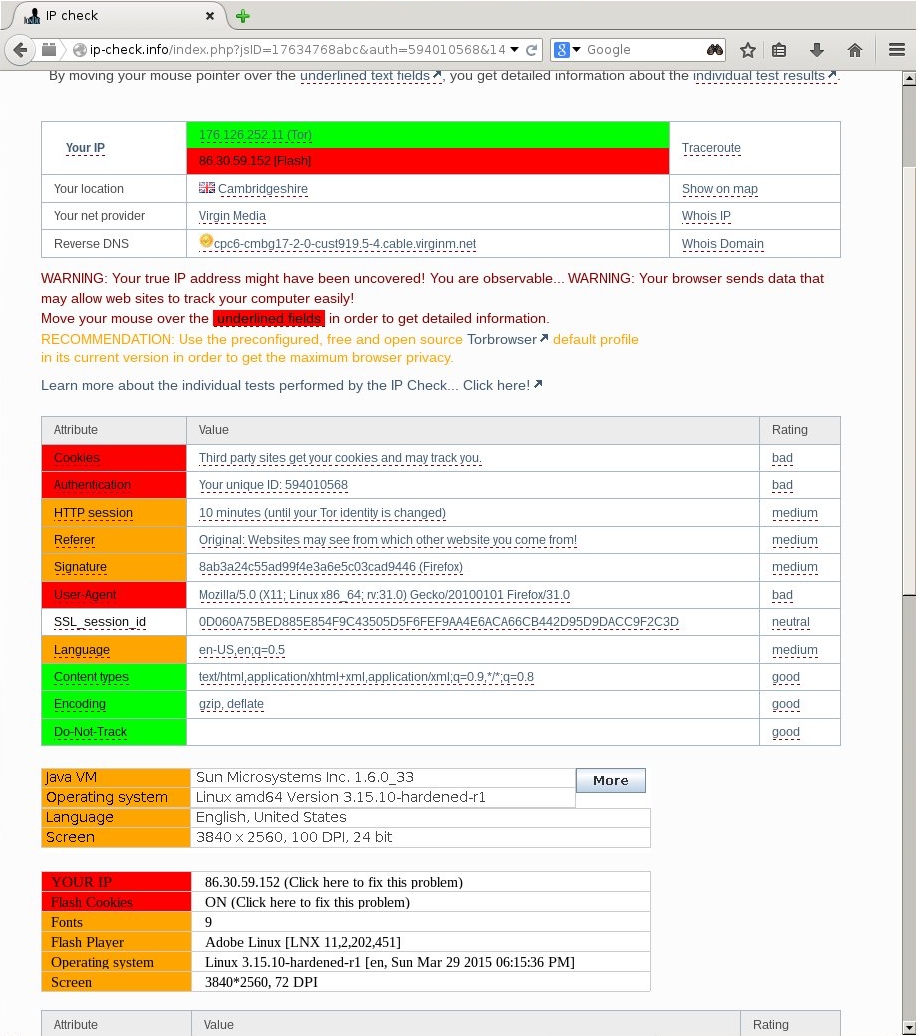
Below is the result of running an anonymity test on JonDonym’s ip-check.info. The browser is configured to use Tor but has Flash and Java enabled, both of which leaked my real IP address. Ouch.
#Solution Perhaps the most obvious solution would be to make sure that any network traffic leaving the machine is going through Tor. A fine idea but personally I would prefer it if the traffic I expect to go through Tor goes through Tor and everything else were stopped in its tracks.
We can configure such a system with a few simple firewall rules. Note that it is not necessarily a good thing to route all traffic through Tor. It is therefor a good idea to set up an isolated environment just for Tor usage, a virtual machine for example or even a dedicated physical machine.
Linux has a firewall built into the kernel itself called Netfilter. As a user we can manipulate network routing rules through a userspace program called iptables.
One way to use iptables to achieve this result is to leverage the owner module to match traffic related to the Unix user that Tor is running under and block everything else.
Below is a simple shell script which when run will set up firewall rules to block all non-Tor traffic from entering and leaving the machine.
#!/bin/sh

#Tor's listening port.
tor_port="9050"

#This will likely be debian-tor by default if
#you're using a Debian based distro.
tor_user="tor"

#Network interface to allow.
interface="wlan0"

#The user to allow access to tor i.e. the user your web browser runs under.
user_user="yukipyon"

iptables -F
iptables -P INPUT ACCEPT
iptables -P FORWARD ACCEPT
iptables -P OUTPUT ACCEPT

iptables -P INPUT DROP
iptables -P OUTPUT DROP

iptables -I INPUT -j ACCEPT -i lo -p tcp --dport $tor_port --sport 1:65000
iptables -A OUTPUT -j ACCEPT -o lo -p tcp --dport 1:65000 --sport $tor_port
iptables -A OUTPUT -p tcp -j ACCEPT -m owner --uid-owner $tor_user -o lo
iptables -A OUTPUT -p tcp -j ACCEPT -m owner --uid-owner $user_user -o lo
iptables -A OUTPUT -p tcp -j ACCEPT -o $interface -m owner --uid-owner $tor_user
iptables -A INPUT -m state --state ESTABLISHED,RELATED -j ACCEPT
#Explination Lets break down the script one piece at a time to make sure we understand what is happening.
tor_port="9050"
tor_user="tor"
These two are Tor options which can be configured in your torrc file. The configuration names are SOCKSPort and User respectively. Note that Tor must run under its own user for this scheme to work. Setting the User Tor configuration option and starting Tor as root is the typically way of doing this. Note that Tor will drop privileges at the first opportunity. Additionally it is possible to manually create a dedicated Unix user for Tor and use su or sudo to start Tor under that user.
iptables -F
iptables -P INPUT ACCEPT
iptables -P FORWARD ACCEPT
iptables -P OUTPUT ACCEPT
These lines will actually clear the current firewall rules and allow all traffic through. You may not want to include them in your own solution but these lines are useful for reversing the effects of the lines that come after.
iptables -P INPUT DROP
iptables -P OUTPUT DROP
Exactly what it says on the tin, block all in and out bound traffic.
iptables -I INPUT -j ACCEPT -i lo -p tcp --dport $tor_port --sport 1:65000
iptables -A OUTPUT -j ACCEPT -o lo -p tcp --dport 1:65000 --sport $tor_port
iptables -A OUTPUT -p tcp -j ACCEPT -m owner --uid-owner $tor_user -o lo
iptables -A OUTPUT -p tcp -j ACCEPT -m owner --uid-owner $user_user -o lo
As you may already know, Tor listens locally as a socks proxy. That means we need to allow the user which indends to make use of Tor to connect to Tor itself through the loopback interface.
iptables -A OUTPUT -p tcp -j ACCEPT -o $interface -m owner --uid-owner $tor_user
iptables -A INPUT -m state --state ESTABLISHED,RELATED -j ACCEPT
These final two lines allow the Tor user to make arbitrary outbound connections and accept inbound traffic related to already established connections.
#Retesting Taking the same ip-check.info as before we now get radically different results.
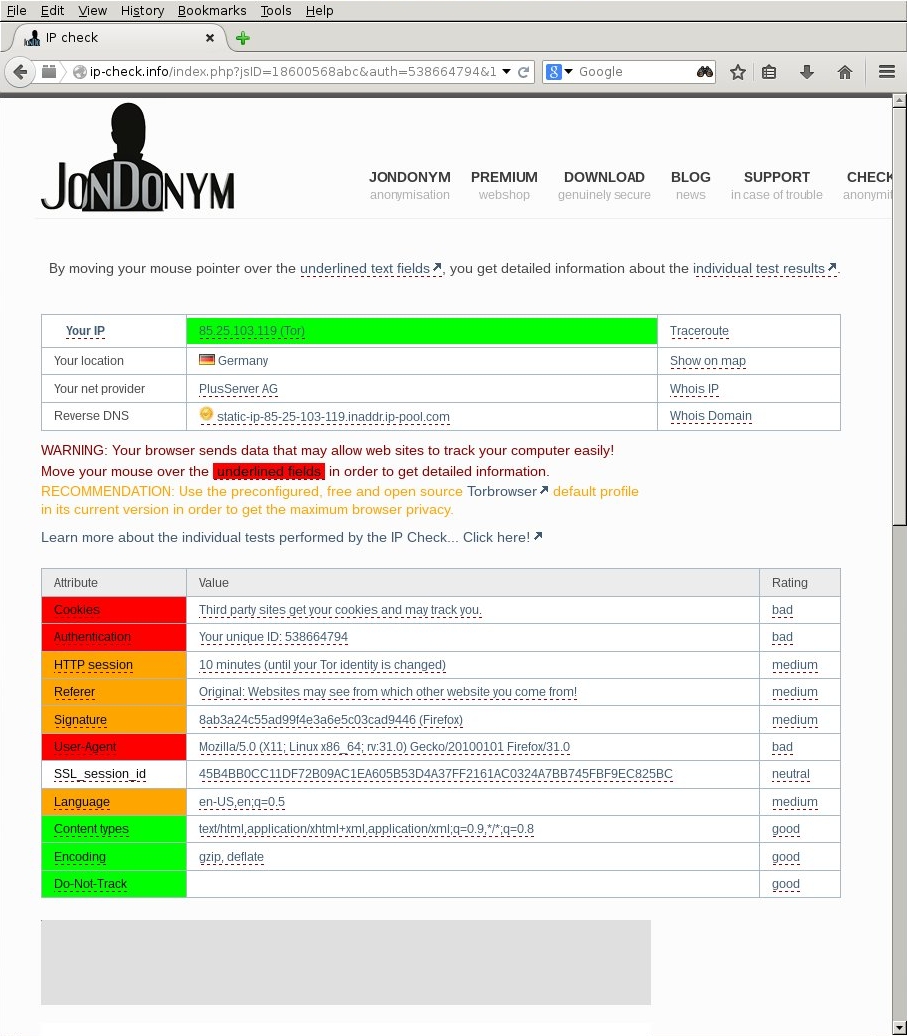 Some red fields persist because they are due to the differences between Tor browser and standard Firefox but the IP leaks have been completely plugged which is the important thing.
Another quick check to make sure it is working is to pull up a root terminal and do something like ping or wget.
# ping 8.8.8.8
PING 8.8.8.8 (8.8.8.8) 56(84) bytes of data.
ping: sendmsg: Operation not permitted
Keep in mind, however, that the root account can still invoke iptable commands to reverse the firewall configuration above. This strategy is designed to protect against accident, not malice.
#ssh Sometimes it is useful to make exceptions for applications other than Tor. Here is an example of how to allow SSH access from a specific IP address.
host=192.168.100.1
iptables -I INPUT -p tcp --dport 22 -s $host -j ACCEPT
iptables -I OUTPUT -p tcp --sport 22 -d $host -j ACCEPT
Note the specific combinations of --dport + -s and --sport + -d (yes it is that way around). It has caused me problems in the past.