Wardriving Part 3 - Analysis
Kismet may produce a number of different files: kistxt, kisxml, nettxt, alert, pcapdump etc. The files of most interest are the ones with the netxml extention. Reading the output files as they are is a tedious task while certain parts such as the GPS coordinates will be completely meaningless. A useful tool for visualising the data is Google Earth.
Google Earth can take input files in the format of Keyhole Markup Language which is based on XML. There are a number of ready made tool available for converting Kismet output to KML form: pykismetkml(Python), Kismet-to-KML(Perl) and one I wrote myself amnixiel(Clojure).
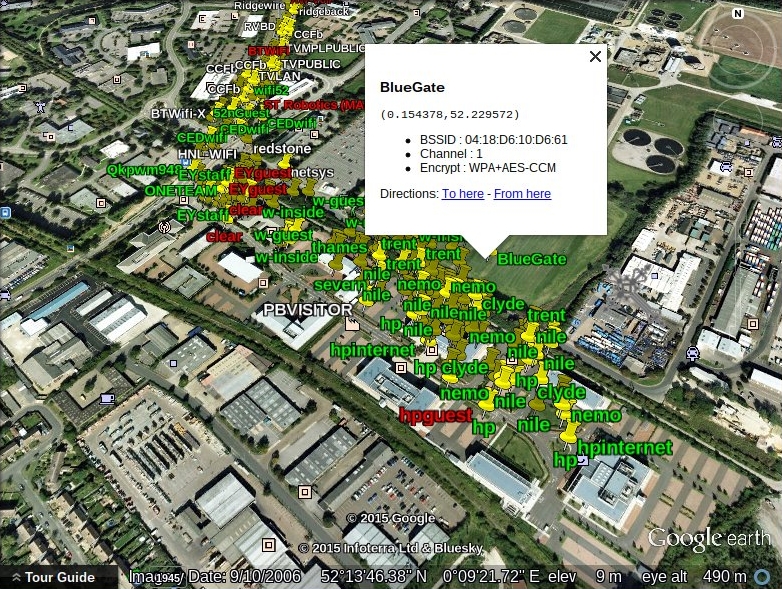
Below is a screenshot of Google Earth visualising the output of data from amnixiel.
Details
Each netxml file contains a list of <wireless-network> tags. Each <wireless-network> contains an <SSID> block, <gps-info> block and some interesting fields such as <BSSID> and <channel>. The <SSID> block contains an <essid> field and zero or more <encryption> fields. The <gps-info> block contains serveral fields relating the GPS coordinates; while there are many clever statistical tricks that can be deployed against the data, a quick and dirty approach is to just take the <max-lon> and <max-lat> fields as is.
Below is an outline of the structure of an example netxml file.
<?xml version="1.0" encoding="ISO-8859-1"?>
<!DOCTYPE detection-run SYSTEM "http://kismetwireless.net/kismet-3.1.0.dtd">
<detection-run kismet-version="2012.GIT.R0" start-time="Wed Feb 18 21:51:37 2015">

<card-source uuid="...">
...
</card-source>
  <wireless-network number="64" type="infrastructure" first-time="Wed Feb 18 21:51:39 2015" last-time="Wed Feb 18 21:52:07 2015">
    <SSID first-time="Wed Feb 18 21:51:39 2015" last-time="Wed Feb 18 21:52:07 2015">
        ...
        <encryption>WPA+AES-CCM</encryption>
        <essid cloaked="false">BlueGate</essid>
    </SSID>
    <BSSID>04:18:D6:10:D6:61</BSSID>
    ...
    <gps-info>
      ...
      <max-lat>52.228840</max-lat>
      <max-lon>0.153333</max-lon>
      ...
    </gps-info>
    ...
  </wireless-network>
</detection-run>
This structure is faily easy to parse with your SAX or DOM parser of choice. The next step is to transmute this data into a KML format which Google Earth can understand.
KML files should start with an XML declaration (<?xml version="1.0" encoding="UTF-8"?>) and the root node should be <Document>. It is important to note the KML is case sensitive so watch out for artibtrary and inconsistent use of capital Letters.
The most basic method of placing a pin on the map is with the <Placemark> tag. This requires:
<name>A lable which hovers above the pin<description>An HTML field which appears in a popup when the pin is examined<Point>which contains two boilerplate tags<extrude>and<alitiudeMode>along with a<coordinate>tag in the format oflongitude,latitude,altitude.
Below is an example of a basic KML file:
<?xml version="1.0" encoding="UTF-8"?>
<Document>
    <Placemark>
        <description><![CDATA[<div><p Style="font-size:8pt;font-family:monospace;">(0.153333,52.228840)</p><ul><li>BSSID : 04:18:D6:10:D6:61</li><li>Channel : 6</li><li>Encrypt : WPA+AES-CCM</li></ul></div>]]></description>
        <name>BlueGate</name>
        <Point>
            <extrude>1</extrude>
            <alitiudeMode>relativeToGround</alitiudeMode>
            <coordinates>0.153333,52.228840,0</coordinates>
        </Point>
    </Placemark>
</Document>